In this article, I am going to show you some of the most simple methods to fix the 8007000E error in Windows 10.
Fix 8007000E Error in Windows 10
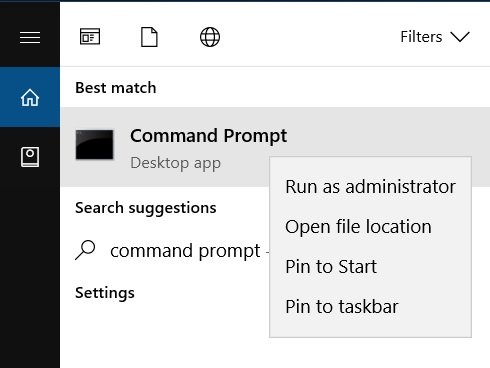
Using the SFC Command
Step 1: Go to the Windows Search Bar and type “Command Prompt”, right-click on it to ‘Run as administrator. Step 2: Once the command prompt windows opens, type the following command, , and hit enter. Let the scan complete, upon completion close the command prompt, and restart your computer. This shall fix your problem.
Using the System Update Readiness Tool
Microsoft has a dedicated System Update Readiness Tool for Windows 10. You can download it according to your Windows version from the link given below. Upon download, you have to run the tool and when the installation is successful, you can restart your computer. That’s it and now you can try updating your computer.
By Installing the KB3102810 Update
Step 1: Download and install Internet Explorer 11 from the link given below. Upon installation, restart your computer. Step 2: Now download the KB3102810 update but don’t install it. First, restart your computer then install the update. Upon the successful installation, again restart your computer. Step 3: Now go to the Windows Search bar, type “Services” and hit enter. Step 4: Go all the way down and search for Windows Update. Step 5: Right-click on it and select ‘Stop’. Step 6: Now open your Windows Explorer and go to C: drive. Navigate to the Windows folder. Step 7: Search for the “SoftwareDistribution” folder and delete it or rename it to “SoftwareDistributionOLD. Step 8: Now go to the Windows Search bar, type “Services” and hit enter. Step 9: Go all the way down and search for Windows Update. Step 10: Right-click on it and select ‘Start’. That’s it and you shall now be good to go.
By Running the Windows Update Troubleshooter
Step 1: Go to the Windows search bar, type “Troubleshoot” and hit enter. Step 2: In the Troubleshoot menu, click on ‘Windows Update”. Step 3: Click on ‘Run the troubleshooter’. Run the troubleshooter and apply the fixes that the troubleshooter suggests and that shall fix the problem for you.
By Running the DISM Tool
Step 1: Go to the Windows Search Bar and type “Command Prompt”, right-click on it to ‘Run as administrator. Step 2: Once the command prompt window opens, type the following commands one-by-one: , and hit enter. , and hit enter. , and hit enter. Now close the command prompt window and restart your computer. This shall fix the problem for you. So that was all about how to fix the 8007000E error in Windows 10. You can try all of the methods mentioned above and your problem will be fixed most probably. In case you face any difficulties, feel free to reach out to us. Read More About
3+ Methods to Activate Windows 10 for FreeDownload Latest Windows 10 ISO File (20H2 Update)How to Install Windows 10X on Your PC (Latest Build)How to Fix Source Path Too Long to Delete Error in Windows 10